
It is every parent’s nightmare: Your kid makes a purchase on your iPhone, iPad, or iPod without your knowledge, and you’re the one who has to foot the bill. In this article, I’m going to explain why iTunes and App Store purchases add up so quickly and how to stop In-App Purchases on your iPhone, iPad, and iPod.

How In-App Purchases Add Up Quickly: Time To Pay the Piper
Did you hear about the boy who ran up thousands of dollars in mere hours on his parents’ iTunes account? Well, it happened. iTunes has one critical flaw for parents: Charges don’t go through instantaneously; they can take days for the purchase to finalize. Personally, I have seen it take as long as a week to go through.
So while the initial purchase you make on your iTunes account can’t be made with an account with a zero or negative balance in your bank account, you can charge more than what’s actually available for every subsequent purchase. This means that the purchases can add up fast and (of course) the transaction will bounce once it hits the bank.
Here’s a fun fact for you: Did you know that your iTunes account can have a negative balance on it? If for some reason a transaction doesn’t clear, it will show as a negative balance, and while your iTunes account has a balance owed, it locks up your iTunes store account. What I mean by this is that you cannot make any new purchases, including free ones, or even update apps at all.
Here’s A True Story For You, About My Sister
My sister had this happen on a very small scale, but it still cost her $46.93 in total. She spent $0.99 on a small In-App purchase for her daughter on her phone and didn’t think anything of it — but she didn’t have Restrictions in place. She then went to the coffee shop to pick up a quick drink while her daughter was at home with her stepdad, merrily playing Hello Kitty Cafe.
While my sister was out, she started getting email alerts about purchases happening in quick succession, with the greatest purchase being for $19.99. My sister quickly went home and told her daughter to “put that down right now!”
This actually happened using the Google Play Store, but the lesson is the same on iPhone and Android: Put those restrictions in place or pay the consequences… literally.

How It Happens: You’re Free To Do Whatever You Want; No Restrictions!
For those of us that don’t have kids and don’t worry about purchases, you can turn off all Restrictions, which means your device won’t ask you over and over again if you’re sure you want to purchase something and make you enter your iTunes password every time.
If you don’t have Restrictions set up, your device will allow you to purchase new Apps, Content, and In-App Purchases with no restrictions. iTunes only makes sure that your payment method works — not how much you have available to spend.
However, there is good news! Your iPhone, iPad, and iPod have several iTunes Restrictions that can be put into place to allow you to purchase and play safely.
You’re On Lockdown: How To Stop In-App Purchases Using Restrictions On iPhone, iPad, and iPod
Restrictions are your new best friend on your device. To find restrictions, go to Settings -> General -> Restrictions on your iPhone, iPad, or iPod.
If no Restrictions are turned on yet, everything will be grayed out and the first thing you’ll have to do is Enable Restrictions and then set a passcode.
If you are a parent, do not set your passcode as the same passcode to unlock your device! This is vitally important, because if you kids know your iPhone, iPad, or iPod passcode, they can also disable Restrictions if the passcode is the same.
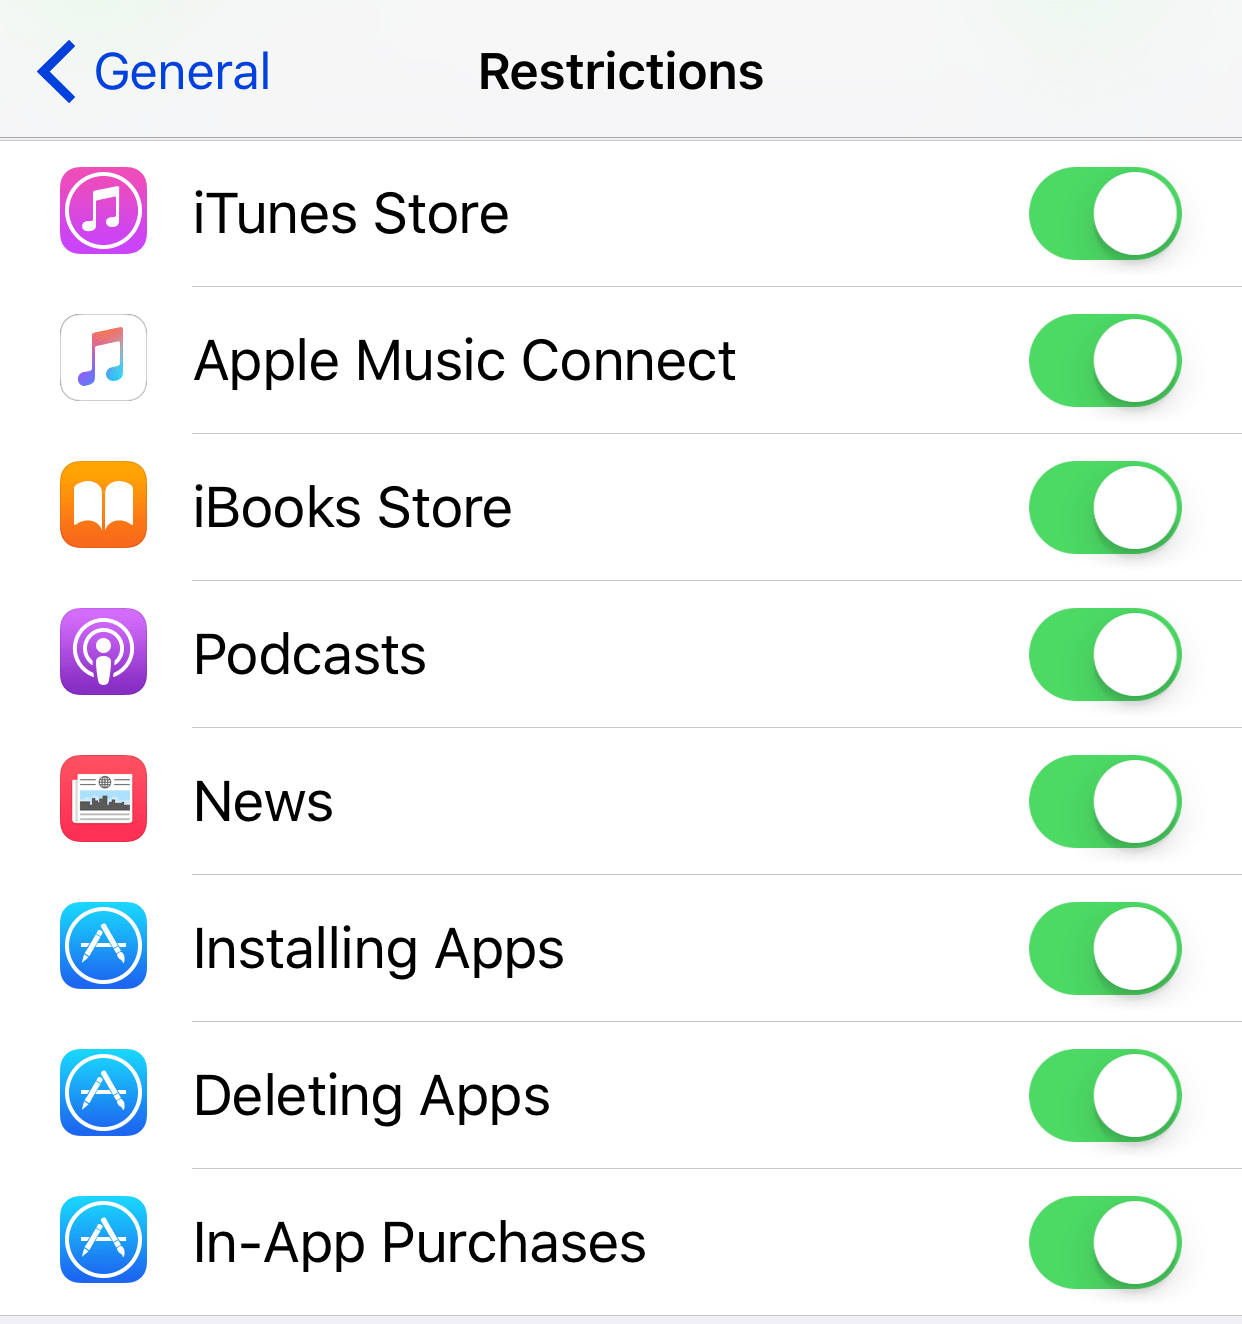
Once Restrictions are enabled, you will see a series of toggle switches, and the last one in this list is In-App Purchases. Simply turn this switch off (this means the switch isn’t green anymore) and this will set up the restriction that no In-App purchases can be made at all. In order to make a purchase in an app, you will have to turn this toggle back on to remove the restriction.
If you don’t want to remove the ability completely, or feel too lazy to go back and forth, you can also make your device require a password for every purchase. This will also restrict your kids from making purchases as long as they don’t have your iTunes password.
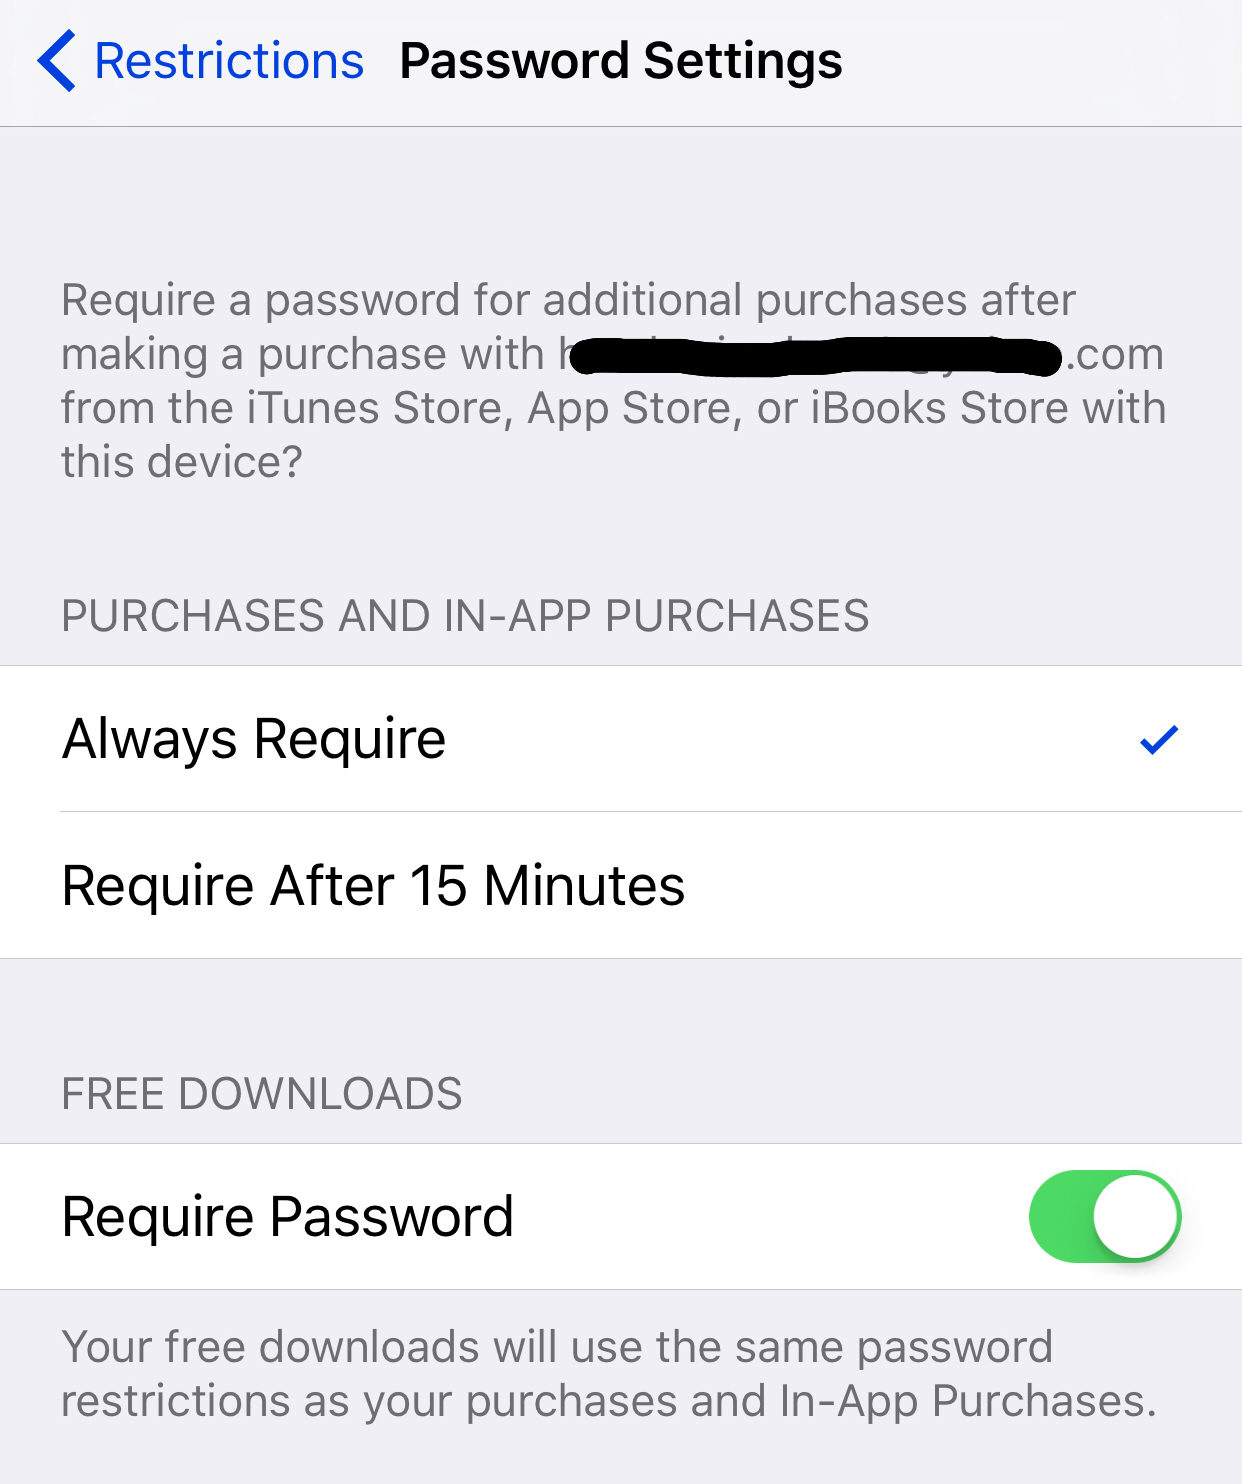
To do this, you will find the option for Password Settings in the Restrictions menu, and this will bring you to a new screen with 2 options:
- Always Require
- Require After 15 Minutes
Due to the fact that I have young kids and I worry about security, I have mine set to Always Require. This means that every single purchase I make, whether it’s an App or for In-App purchases, content, or anything that requires a download, I must enter my iTunes Password.
The other option for Require After 15 Minutes means that you have to enter in your password once every 15 minutes, but this is still not a good idea if you have kids because they can make a lot of purchases in 15 minutes.
There is one more subheading in this screen, which is a switch for Free Downloads. In my screenshot you can see that the toggle for Require Password is on (it’s green), which means that I have to enter my password for free purchases as well.
In my opinion, you can go ahead and turn this off, which means that you don’t need to enter a password for free purchases. This gives your kids the freedom to download anything that’s free, and that means they have a little freedom to get new games or apps.
Of course, you will have to monitor their devices for content you don’t want to be on there, just to make sure that their apps are age appropriate.
Touch ID & Passcode: The iPhone Fingerprint Scanner Makes Purchases Easier
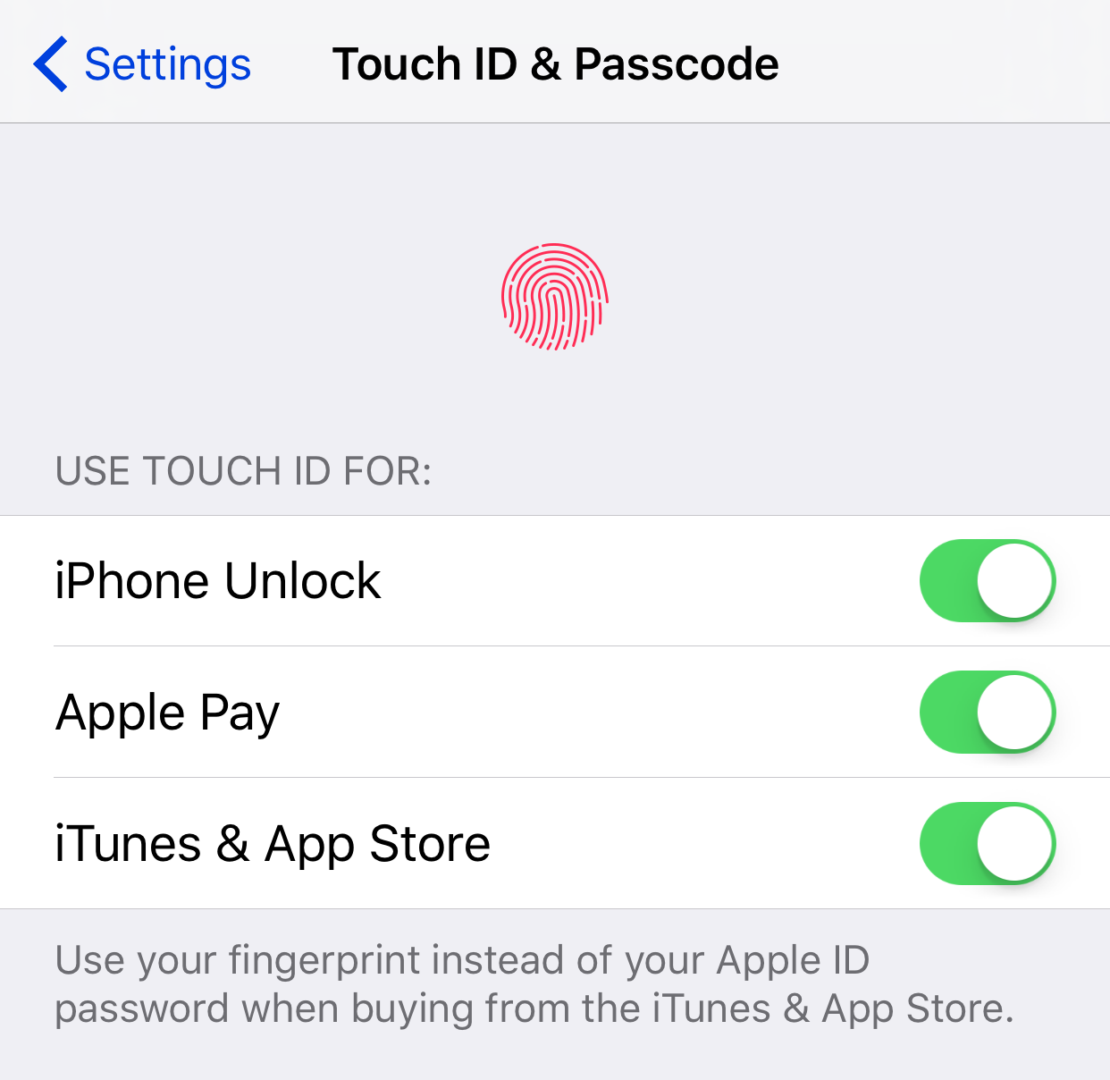
There is one thing to note: If you have a Touch ID-capable iPhone or iPad and you have it enabled for iTunes & App Store use, then the menu for Password Settings will not be available in the Restrictions screen. In my opinion, this is most likely due to how easy it is to enter your password to make purchases with the touch of a finger.
By default, having Touch ID enabled for iTunes and App Store means you need to enter your password every time you make a purchase, including In-App purchases. Every time you restart or update your iPhone or iPad, you’ll need to enter your password the first time you make a purchase, and then it will ask for your fingerprint for subsequent purchases.
Congrats! No More Surprises For You!
You have now learned one more Mom’s Tips for Technology to add to your parent trick arsenal. Using these settings and Restrictions now allows you to give your iPhone, iPad, or iPod to your kids safely, without worrying about surprise purchases. I have been using these settings for years and have never had an unwanted purchase, so I pass this information on to my fellow parents, to give everyone peace of mind with their Apple devices.