
You have too many photo albums on your iPhone and you want to delete them. Deleting iPhone albums is a great way to free up some extra storage space and reduce clutter. In this article, I’ll show you how to delete albums on your iPhone!
Why Should I Delete Albums On My iPhone?
Some third-party apps automatically create photo albums on your iPhone of the images you post within the app. This is especially common with social media apps like Instagram and Twitter.
The albums created by these apps can take up a lot of storage space because photos are relatively large files. The more photos you post in these apps, the larger the albums become and the less iPhone storage space you’ll have.
Deleting albums is a great way to clear up clutter in Photos and save yourself a little extra storage space!
How To Delete iPhone Albums
To delete albums on your iPhone, open Photos and tap the Albums tab at the bottom of the screen. Tap the Sell All button next to My Albums. Then, tap Edit in the upper right-hand corner of the screen.
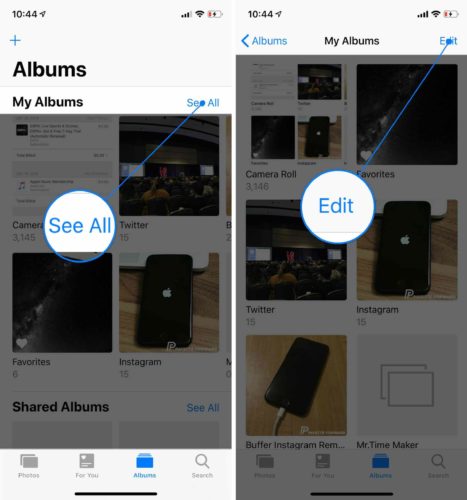
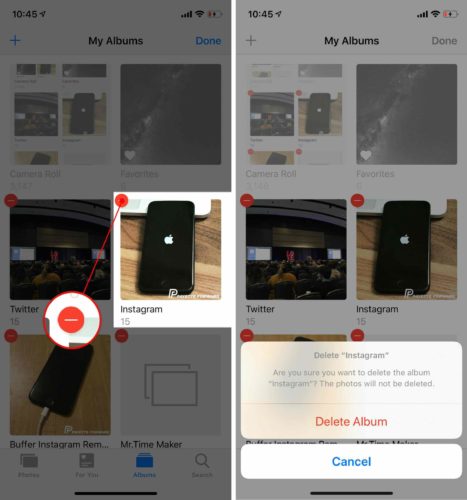
Next, tap the red minus button in the upper left-hand corner of the album. Finally, tap Delete Album to delete the iPhone photo album. When you’re done deleting iPhone albums, tap Done in the upper right-hand corner of the screen.
Why Can’t I Delete Some Albums?
Some photo albums on your iPhone can’t be deleted. You won’t be able to delete:
- Your iPhone’s Camera Roll.
- Albums automatically created by your iPhone, such as your People & Places albums.
- Media Types albums (Videos, panoramas, etc.).
- Albums synced from your computer using iTunes.
If you synced iPhone albums from your computer, you can delete them, but you’ll have to do so in iTunes.
How To Delete iPhone Albums Synced From iTunes
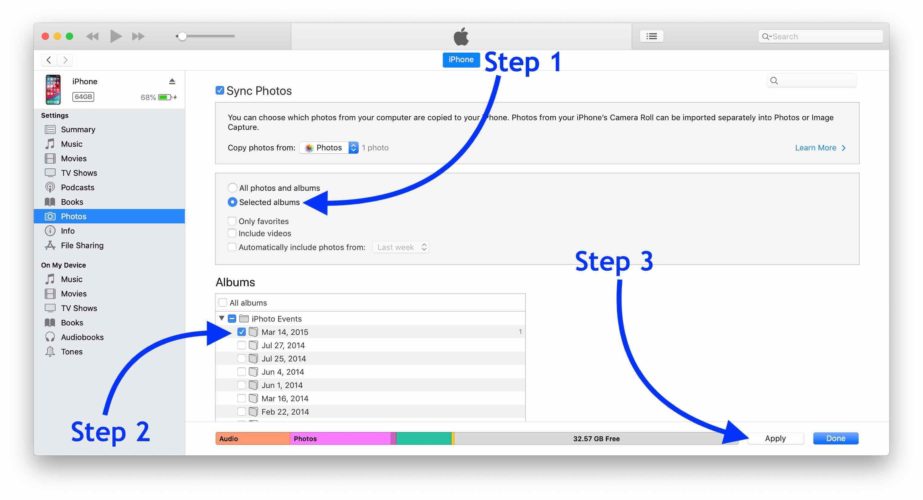
Plug your iPhone into your computer using a Lightning cable and open iTunes. Click on the iPhone icon near the upper left-hand corner of iTunes, then click Photos.
Make sure the circle next to Selected Albums is selected, then choose the albums you want on your iPhone. Any albums you deselect will be deleted from your iPhone!
When you’ve finished selecting the albums you want to sync to your iPhone, click Apply in the bottom right-hand corner of the screen. This will sync your iPhone to iTunes. When your iPhone has finished syncing, click Done in the bottom right-hand corner of the screen.
Goodbye, Albums!
You’ve deleted some of your iPhone albums and cleared up some additional space on your iPhone. Make sure to share this article on social media to show your friends and family how to delete albums on their iPhone! If you have any other questions about your iPhone, leave them in the comments section below.
Thanks for reading,
David L.
I can delete an album at a time but how can I delete Selene a lot and a lot them altogether with one delete ?
Somehow my camera app has made 1000 + empty photo albums
In the instructions it says, “Type the ‘Sell All’, when it should be “see all”? ?
Yup!
Yupper, is correct!!!!
There isn’t a red button on the top left.
Still no minus red line on this phone why so many issues going get rid of this iPhone 6s
I do not see any red dot. I am on iphone 11
I need to save my contacts, texts, and Word docs and was told it was possible with a USB flash drive. First, is this information correct, and secondly; which is the best USB flash drive for these jobs if the information is indeed correct? Thank you.
i was able to do this in icloud.com exported to pdf file for offline access.