! Here’s The Fix.")
As a technology writer, I use AirDrop all the time. Nearly every day, I use AirDrop to transfer screenshots from my iPhone to my Mac for articles and 99% of the time, it works flawlessly. Occasionally, however, AirDrop refuses to work on my iPhone. In this article, I’m going to show you how to use AirDrop on iPhone and Mac and walk you through how to fix AirDrop when it isn’t working.
If you already know how to use AirDrop but are still having issues sending and receiving files or viewing other AirDrop users, feel free to skip to the section titled “Help! My AirDrop Isn’t Working!”
AirDrop on iPhones, iPads, and iPods: Same Problem, Same Solution
AirDrop problems are software-related, and iPhones, iPads, and iPods all run the same operating system: iOS. If you’re having a problem with AirDrop on your iPad or iPod, just substitute your device for iPhone as you read this article. The solutions are exactly the same. Tip: In the tech world, iPhones, iPads, and iPods are all referred to as iOS devices.
Sending Files Using AirDrop
AirDrop can be used to send files between Macs and iPhones, Macs and Macs, and iPhones and iPhones (as well as other iOS devices like iPads and iPods). For demonstration purposes, I’m going to be sending files between an iPhone and a Mac. The process for sending files using AirDrop is the same regardless of the device you’re sending to.
Turning On AirDrop
Before you can AirDrop a file, we need to enable AirDrop on your iPhone or iPad. It’s a simple process on iOS and Mac — I’ll walk you through it below.
How To Turn On AirDrop On iPhone
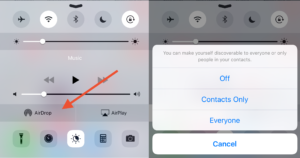
On your iPhone, use your finger to swipe up from the very bottom of the screen to reveal Control Center. At the bottom of the screen, you’ll see a button labeled AirDrop. Tap on this button and your iPhone will ask if you’d like to be discoverable by everyone, or just by people in your contacts — choose whichever option works best for you. Your iPhone will automatically turn on Wi-Fi and Bluetooth and become discoverable via AirDrop.
What Does “Discoverable” Mean In AirDrop?
In AirDrop, when you make your iPhone discoverable, you’re deciding who can use AirDrop to send files to you. If you’re only going to be sending files back and forth with your friends (or yourself), choose Contacts Only. If you’re going to be sharing pictures and other files, choose Everyone.
I generally choose to make myself discoverable only to my contacts. Being discoverable to everyone is convenient, but everyone around you with an iPhone or Mac will be able to see your device’s name and can request to send you files. As someone that commutes on a city train every day, this can get quite annoying.
How To Turn On AirDrop On Mac
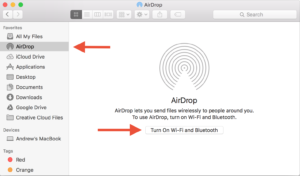
- Click on the Finder icon
 on the left-hand side of your Mac’s dock to open a new Finder window. Look at the left-hand side of the window and click on the AirDrop button.
 - If Bluetooth and Wi-Fi (or either of the two) aren’t enabled on your Mac, there will be a button that reads Turn On Wi-Fi and Bluetooth at the center of the Finder window. Click on this button.
- Look at the bottom of the window and click on the Allow me to be discovered by button. You’ll be asked to choose if you’d like to be discoverable by everyone or just your contacts when using AirDrop.
Sending And Receiving Files On Your iPhone
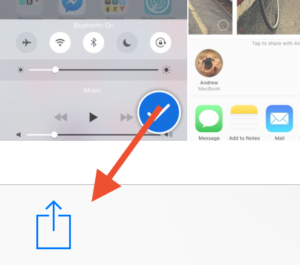 You can AirDrop content from most iPhone, iPad, and iPod apps that have a standard iOS share button (pictured above). Many native iOS apps like Photos, Safari, and Notes have this button and are compatible with AirDrop. In this example, I’m going to AirDrop a photo from my iPhone to my Mac. Tip: The apps that come preinstalled on your iPhone are often referred to as native apps.
AirDropping Files From Your iPhone
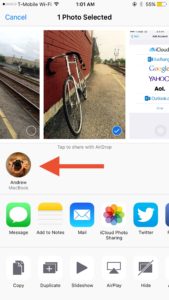
- Open the Photos app on your iPhone and select the photo you’d like to AirDrop by tapping on it.
- Tap the Share button on the bottom left-hand corner of the screen and you will see a list of AirDrop devices near you. Proceed to tap on the device you’d like to send your photo to, wait for the recipient to accept the transfer, and your photo send instantly.
Receiving Files On Your iPhone
When you’re sending a file to your iPhone, you’ll get a pop-up notification with a preview of the file that’s being sent. To accept the file, just tap the Accept button at the bottom right corner of the notification window.
On iPhones and other iOS devices, received files are saved inside the same app that sent the files. For example, when you use AirDrop to share a website, the URL (or website address) opens in Safari. When you send a photo, it is saved in the Photos app.
Sending And Receiving Files On Your Mac
On a Mac, you can use AirDrop to send just about any kind of file to other Macs and supported filetypes (like photos, videos, and PDFs) to an iOS device. The AirDrop process is a little bit different on Mac than on an iPhone, but in my opinion, it’s just as easy to use.
How To Use AirDrop To Send Files From Your Mac
- Click on the Finder icon on the far left-hand side of your Mac’s dock to open a new Finder window. Then, click AirDrop in the left-hand sidebar.
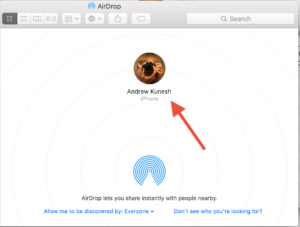
- Look towards the center of the screen and you will see all other discoverable AirDrop devices near you. When you see the device you’d like to send a file to, use your mouse or trackpad to drag the file on top of the device, and then let go. Once the recipient approves the transfer on their iPhone, iPad, or Mac, it will be sent immediately.
Sending Files To Older Macs
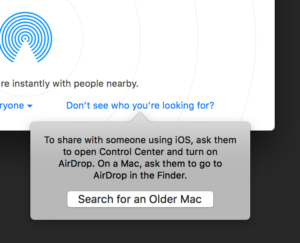
If you have a Mac that was released in 2012 or later and you’re trying to send a file to a Mac built before 2012, you’ll need to search separately for the older Mac. To do this, click on the Don’t see who you’re looking for? button at the bottom of the AirDrop menu. Then, click the Search for an Older Mac button in the pop-up window and the older Mac will appear.
Receiving A File On Your Mac
When someone AirDrops a file to your Mac, you’ll get a notification with a preview of the file being sent and the sender’s name. Click on the preview and a Finder window will appear with a message that asks if you’d like to accept the transfer. To accept, click the Accept button in the Finder window. The file will be saved in your Downloads folder.
Help! My AirDrop Isn’t Working!
As I mentioned before, AirDrop can have occasional problems. The most common issues are these:
- AirDrop won’t send or receive from other devices
- AirDrop can’t find (or discover) other devices
Most of the time, a bit of troubleshooting can clear up these issues and get you back up and running in no time. I’ll walk you through my usual AirDrop troubleshooting process below.
Start With The Basics: Restart Bluetooth And Wi-Fi
A good starting point is to turn Bluetooth and Wi-Fi off and back on, and then try your transfer again. In my experience, this fixes AirDrop issues more often than not. If you’re unsure of how to do this, I’ve got you covered:
Restarting Bluetooth and Wi-Fi On Your iPhone
![]()
- Swipe up from the very bottom of your screen to pull up the Control Center menu.
- You’ll see the Wi-Fi and Bluetooth buttons at the top of this menu. Tap each of these buttons once to disable Bluetooth and Wi-Fi and then again to turn them back on.
Restarting Bluetooth and Wi-Fi On Your Mac
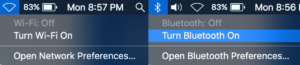
- Look in the upper right-hand corner of your screen (just to the left of the clock) and you’ll see Bluetooth and Wi-Fi icons.
- Click on the Wi-Fi icon to open the dropdown menu and choose Turn Wi-Fi Off. Wait a few seconds, click the Wi-Fi icon again, and choose Turn Wi-Fi On. Next, we’ll do the same with Bluetooth:
- Click on the Bluetooth icon to open the dropdown menu and choose Turn Bluetooth Off. Wait a few seconds, click the Bluetooth icon again, and choose Turn Bluetooth On.
- Try AirDropping your files again.
Change Your Discoverability Settings
As we discussed earlier in this article, when you’re using AirDrop to send or retrieve files, you can allow your Mac or iPhone to be discovered (or seen) by everyone with an Apple device or only by your contacts. If you keep your device in Contacts Only mode and your iPhone or Mac doesn’t show up on their device, try temporarily switching your device to be visible to Everyone. To change your discoverability settings, please refer to the “Sending Files Using AirDrop” portion of this article.
If changing to Everyone fixes the problem, double-check that the other person’s contact information is correctly entered on your device and that your contact information is entered correctly on theirs.
Make Sure Personal Hotspot is Turned Off
Unfortunately, AirDrop won’t work when Personal Hotspot is enabled on your iPhone. To check if Personal Hotspot is enabled, follow these steps:
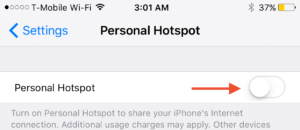
- Open the Settings app on your iPhone and tap the Personal Hotspot button at the top of the screen.
- You’ll see an option labeled — you guessed it — Personal Hotspot at the center of the screen. Make sure the on/off switch to the right of this option is set to the off position.
If All Else Fails, Try A DFU Restore
If all else fails, there may be something wrong with the Bluetooth or Wi-Fi hardware settings on your iPhone. At this point, I recommend trying a DFU restore. A DFU (or device firmware update) restore erases everything from your iPhone, including all hardware and software settings, and makes it essentially as good as new.
If you decide to go this route, follow our DFU restore guide. Make sure to back up your data before you begin, because a DFU restore deletes all content from your iPhone.
AirDrop It Like It’s Hot!
And there you have it: AirDrop is working again on your iPhone, iPad, and Mac — I hope this guide helped you out! I believe that AirDrop is one of the most invaluable features on my iPhone and I find new uses for it every day. I’d like to know which of the troubleshooting steps fixed your AirDrop connection and how you use AirDrop in your daily routine in the comments section below.
hi i do everthing but still not working.. i dont know if my airdrop is off , icant find how to switch on..
great
Thank you! My MacBook was not discoverable by my iPhone. It didn’t occur to me to turn off the Bluetooth and turn it on again *duh*. Simple and effective!