Creating backups is an essential and often-overlooked part of owning an iPhone. While many of our articles encourage readers to back up their iPhone when it’s not working, it’s also a good idea to back up your iPhone when it’s working normally. In this article, I’ll show you how to back up your iPhone and explain why it’s important.
What Is An iPhone Backup?
An iPhone backup is a copy of all the information on your iPhone. You can transfer that backup to a new phone, or restore your iPhone from it if it experiences a software or firmware issue.
An iPhone can be backed up to Finder, iTunes, or iCloud. We’ll help you decide which method is best for you later in this article.
Why Is It Important To Back Up Your iPhone?
Creating a backup of your iPhone helps keep your data safe, even if your iPhone crashes or breaks. If you drop your iPhone on the sidewalk or in the toilet, you may not be able to recover important information like your photos, videos, and contacts. Regularly saving a backup will give you peace of mind knowing your iPhone’s data is safe.
How to Back Up Your iPhone To iCloud
It’s usually easiest to back up your iPhone to iCloud as it can be done in the Settings app. Your iPhone also automatically creates an iCloud backup when its locked, connected to Wi-Fi, plugged into a power source, and has enough iCloud storage space to save the backup.
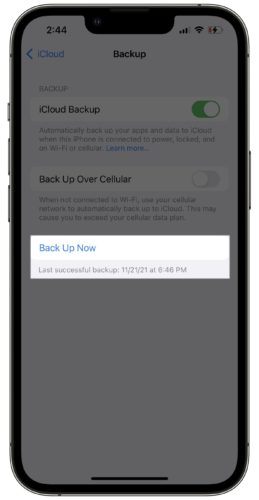
Open Settings and tap on your name at the top of the screen. Then, tap iCloud -> iCloud Backup. Make sure the switch next to iCloud Backup is on. Then, tap Back Up Now.
The time and date of your most recent iCloud backup will appear below the Back Up Now button. If you see the current time, your backup is complete!
I Don’t Have Enough Storage Space To Back Up To iCloud!
If you don’t have enough iCloud storage space to save a backup, you have two options:
- Buy additional iCloud storage space for as little at $0.99 / month.
- Delete some of the data already backed up to iCloud.
If you’re considering buying extra iCloud storage space, check out our article on ways to get around paying for iCloud backups. You may still be able to back up your iPhone to iCloud without spending a dime!
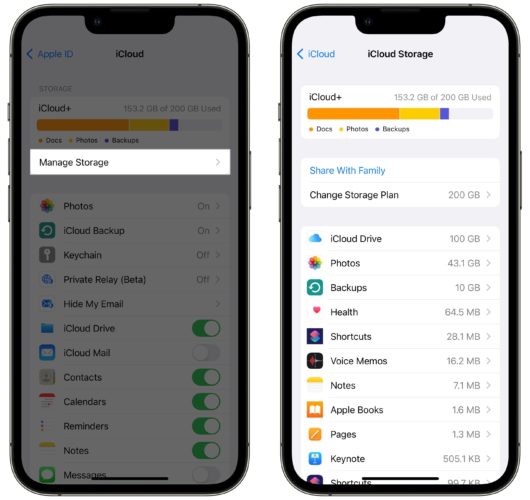
If you’d rather just clear out some iCloud storage space, head to Settings -> Your Name -> iCloud -> Manage Storage.
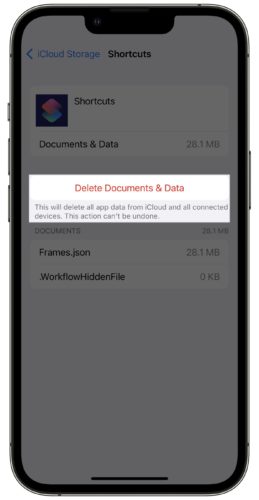
Tap on the item you’d like to clear out from iCloud storage. Finally, tap Delete. Different applications may have different delete buttons, so don’t be surprised if you see Delete Documents & Data or Delete Data too.
Turn Off Back Up Over Cellular
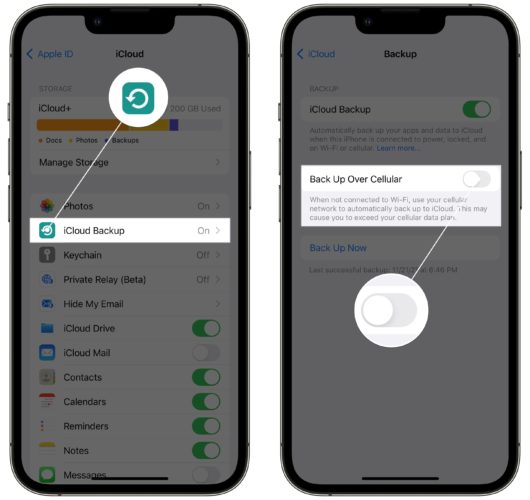
Those with 5G iPhones have the option to enable Back Up Over Cellular. This setting allows your iPhone to automatically back up to iCloud using cellular data.
iCloud backups can be very large, so it’s possible that backing up over cellular just once could use up all your data for the month.
Apple even admits this in the Settings app. Beneath Back Up Over Cellular, you can see a warning that says, “This may cause you to exceed your cellular data plan.”
We strongly recommend turning off Back Up Over Cellular and only backing up to iCloud when your iPhone is connected to Wi-Fi. Go to Settings -> Your Name -> iCloud -> iCloud Backup and turn off the switch next to Back Up Over Cellular.
Alternatively, Back Up Over Cellular can be turned off in Settings -> Cellular. Scroll all the way down to find iCloud Backup. Turn off this switch to prevent your iPhone from backing up to iCloud using cellular data.
How to Back Up Your iPhone to Finder
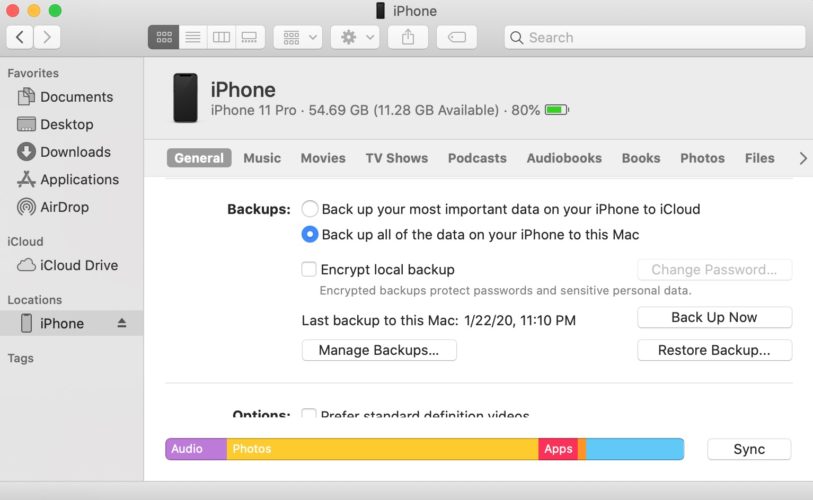
If you have a Mac running macOS Catalina 10.15 or newer, you’ll use Finder to back up your iPhone.
Connect your iPhone to your Mac using a charging cable. Open Finder and click on your iPhone under Locations. Scroll down to the Backups section and click Back up all of the data on your iPhone to this Mac. Finally, click Back Up Now.
The backup process usually takes about 15–20 minutes. You’ll know the backup is complete when you see the current date and time next to Last backup to this Mac.
What Happed To iTunes?
iTunes became Music when macOS Catalina 10.15 was released. Now, when you want to sync, backup, or DFU restore your iPhone, you do so using Finder. Despite this change, everything else is pretty much the same — the interface even looks pretty similar.
If you have a PC or a Mac running macOS Mojave 10.14 or earlier, you will still back up your iPhone using iTunes.
How to Back Up Your iPhone to iTunes
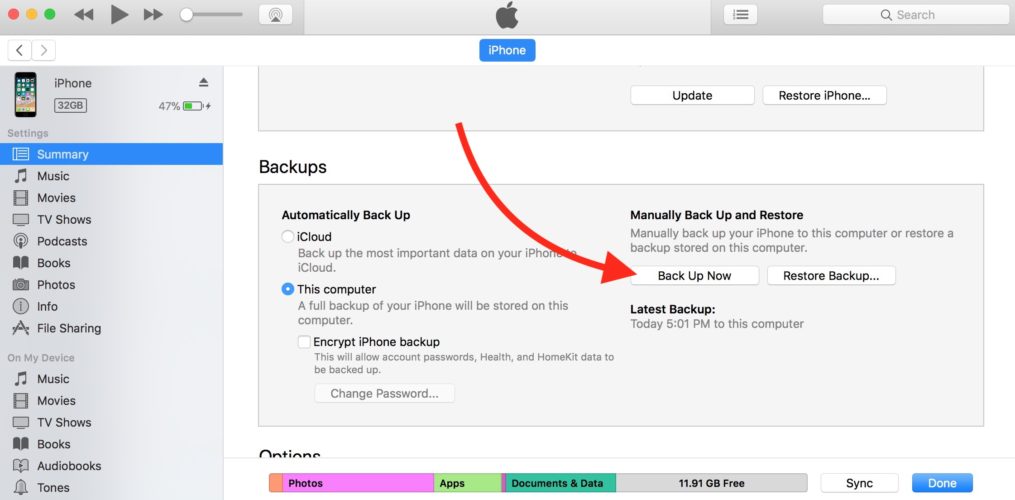
Connect your iPhone to your Mac (running macOS Mojave 10.14 or earlier) or PC using a Lightning cable. Then, open iTunes and click on the iPhone icon near the upper left-hand corner of the screen.
Click the circle next to This computer, then click Back Up Now. When the backup is finished, you’ll see the time and date appear under Latest Backup.
Should I Encrypt My iPhone Backups?
When creating a backup using Finder or iTunes, you have the option to encrypt the backup. Encrypted backups can save additional information that unencrypted backups can’t, including your passwords, website history, health data, and Wi-Fi settings.
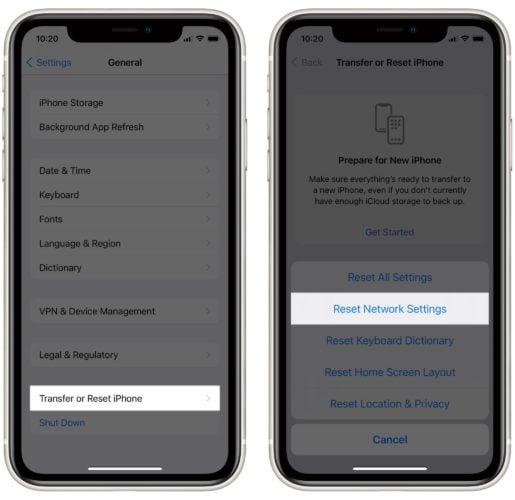
When you save an encrypted backup, you create a password for that backup, so make sure it’s something you’ll remember. If you do forget the password for an encrypted backup, reset the network settings on your iPhone by opening Settings and tapping General -> Transfer Or Reset iPhone -> Reset -> Reset Network Settings. This reset reverts your iPhone’s Wi-Fi, Cellular, APN, and VPN settings to factory defaults.
Once the reset is complete, create a new encrypted backup using Finder or iTunes.
Backed Up & Ready To Go
You can rest easy now that you’ve backed up your iPhone. Make sure to share this article on social media so you can teach your family and friends how to back up their iPhone, and why it’s important! If you have any other questions, leave a comment down below.
Every time I try to back up it says there’s not enough iCloud storage available. I don’t understand I only have 3.7 gigs out of 5 gig photos
Check out our other article — you’ll never have iCloud storage issues again.