
You’re syncing your iPhone to iTunes on your Mac and decide to backup your iPhone as a part of your weekly routine. You press the Backup Now button in iTunes, but you keep getting error messages. No matter what you try, your iPhone won’t backup to iTunes on your Mac. And to make matters worse, you swore this worked last week.
Luckily, this is a relatively common iPhone issue — in fact, I run into it on a regular basis. Likewise, it’s also a very easy issue to fix. In this tutorial, I’m going to walk you through how to fix an iPhone that won’t backup to iTunes on Mac.
Why Won’t My iPhone Backup To iTunes On Mac?
There are many possible reasons for your iPhone not backing up to iTunes, so there’s no one solution for fixing iTunes backups. However, I will walk you through a quick troubleshooting process that will help you pin-point what’s causing your iPhone to not backup to iTunes. You’ll be back up and running in no time!
1. Make Sure Your iTunes Is Up To Date
First off, one of the most common reasons for iPhone backups to fail is that iTunes is out of date on your Mac. To update iTunes, follow this process:
How Do I Update iTunes On My Mac?
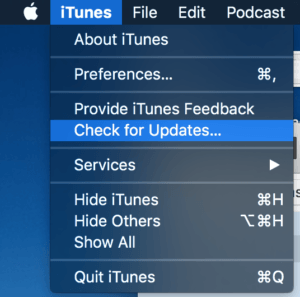
- Open iTunes on your Mac.
- Click iTunes in the menu bar in the upper right-hand corner of your Mac’s screen.
- Click the Check For Updates button on the drop-down menu. iTunes will then walk you through the update process if it’s out of date. If your copy of iTunes is already up to date, a confirmation window will appear displaying your iTunes’ software version number.
2. Try A Different USB Port And Lightning Cable
If you’re getting the dreaded “iTunes could not backup because the iPhone disconnected” error, there may be an issue with your computer’s USB port or your iPhone’s USB cable. This error can often be fixed by using a new USB cable and different USB port on your computer to sync your iPhone to your computer — make sure to give it a shot!
3. Delete Old Backups From Your Mac
Sometimes old backups can interfere with iTunes when it’s attempting to backup. Unfortunately, the only easy way to fix this is by deleting old backups. However, this isn’t the end of the world if you’ll be replacing the old backup with a new one anyway.
How Do I Delete Old Backups From iTunes On My Mac?
- Open iTunes on your computer.
- Click the iTunes button at the upper, righthand corner of your computer’s screen and click Preferences from the drop-down menu.
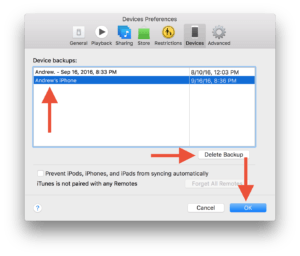
- Click the Devices button from the top of the pop-up window.
- Find your device’s name at the center of the screen and click on it to select its backup. Then, click the Delete button at the middle of the screen to delete its backup.
- Click the OK button at the bottom righthand corner of the screen to confirm you’d like to delete the backup. You can now try and backup your iPhone again in iTunes.
4. Backup Your iPhone to iCloud and Restore
If after trying these troubleshooting steps you’re still having issues backing up your iPhone, you may have to backup your iPhone to iCloud and perform a DFU restore. This will erase all bugs from your iPhone that may be preventing iTunes backups while keeping a copy of your data backed up in the cloud.
Like I stated earlier, the first step in this process is to back up your iPhone to iCloud. To do this, follow these three steps:
- Open the Settings app on your iPhone, scroll down, and tap the iCloud button.
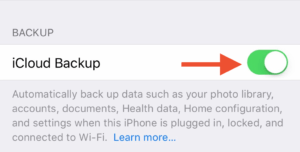
- Scroll to the bottom of the screen and tap the Backups button. Tap the slider button to the right of the iCloud Backup header to enable iCloud backups.
- Tap the Back Up Now button at the bottom of the screen to start an immediate iCloud backup.
If you run into any issues when performing an iCloud backup, follow our guide on what to do when an iPhone won’t backup to iCloud.
Now that your iPhone is backed up, it’s time to perform a DFU restore in iTunes. This is different from a traditional iTunes restore because it clears out all data and settings from the device — both software and hardware. This is generally seen as the end-all-be-all solution for most iPhone and iPad issues. Read our DFU restore guide to start this process.
Note: DFU restores erase all data from your iPhone, so ensure your iCloud backup competes before proceeding with a DFU restore.
Happy Backing Up!
And that’s all there is to fixing an iPhone that won’t backup with iTunes on your Mac! In the comments, let me know which of these troubleshooting steps finally fixed your iTunes backups. And as always, remember to check back soon for more iPhone tips, tricks, and fixes!
This is very helpful tips. I works for me when I delete the old backup file. Thanks so much.