You want to become a better iPhone photographer, but you’re not sure where to start. There are many great iPhone Camera features hidden away in Settings. In this article, I’ll tell you about the essential iPhone Camera settings!
Preserve Camera Settings
Do you get tired of having to select your preferred settings every time you open Camera? There’s an easy fix for that!
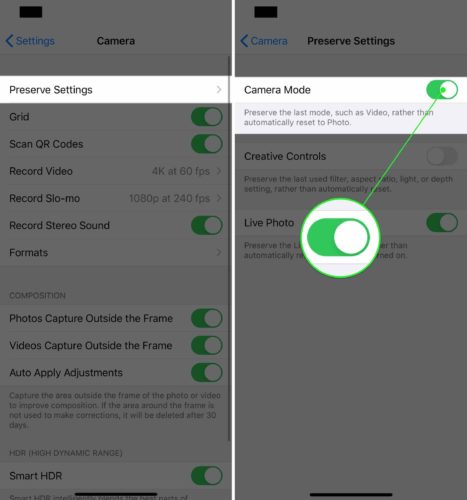
Open Settings and tap Camera -> Preserve Settings. Turn on the switch next to Camera Mode. This will preserve the last Camera mode you used, such as Video, Pano, or Portrait.
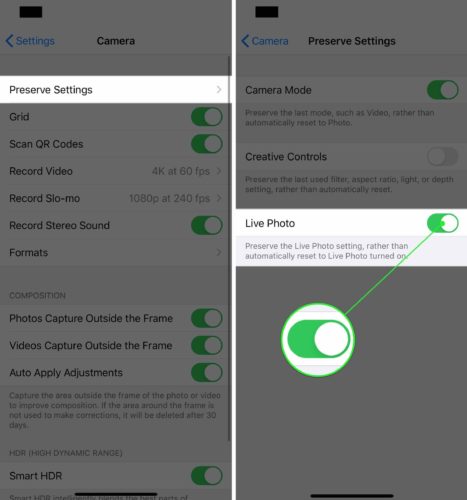
Next, turn on the switch next to Live Photo. This preserves the Live Photo setting in Camera, rather than resetting it to on every time you reopen the app.
Live Photos are neat, but they don’t have a lot of uses. Live Photos are also significantly larger files than regular photos, so they’ll eat up a lot of iPhone storage space.
Set Video Quality
New iPhones are capable of recording movie-quality videos. However, in order to record the highest quality videos, you’ll have to preselect the video quality in Settings.
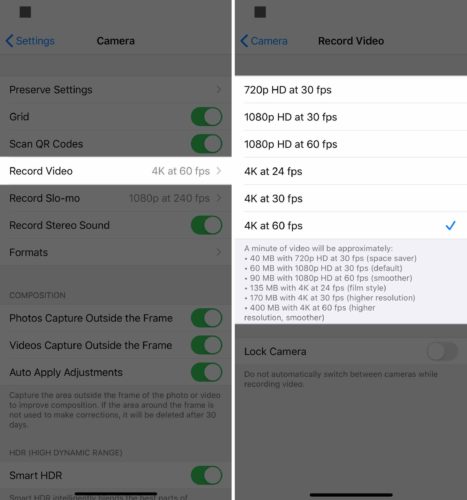
Open Settings and tap Camera -> Record Video. Select the video quality you’d like to record at. I have my iPhone 11 set to 4K at 60 frames per second (fps), the highest quality available.
Keep in mind that higher-quality videos will take up more space on your iPhone. For example, 1080p HD video at 60 fps is very high-quality, and those files will be less than 25% the size of a 4K video at 60 fps.
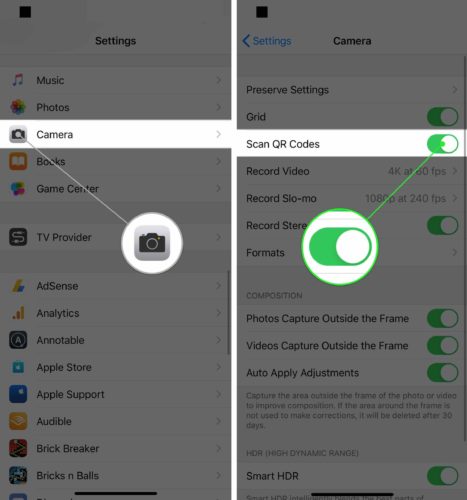
Turn On Scan QR Codes
QR codes are a type of matrix bar code. They have a lot of different uses, but most of the time a website or app will open when you scan a QR code using your iPhone.
Add QR Code Scanner To Control Center
You can add a QR code scanner to Control Center to save a little time!
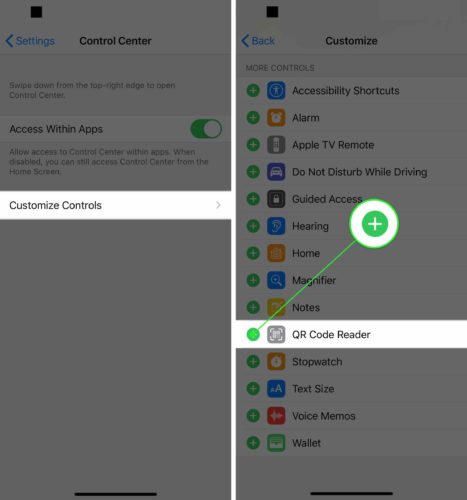
Open Settings and tap Control Center -> Customize Controls. Tap the green plus next to QR Code Reader to add it to Control Center.
Now that QR Code Reader has been added to Control Center, swipe down from the upper right-hand corner of the screen (iPhone X or newer) or swipe up from the very bottom of the screen (iPhone 8 and older). Tap the QR Code Reader icon and scan the code!
Turn On High Efficiency Camera Capture
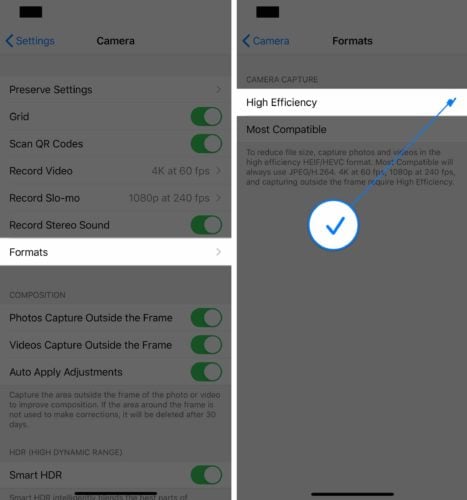
Switching the Camera capture format to High Efficiency will help reduce the file size of the photos and videos you take with your iPhone.
Open Settings and tap Camera -> Formats. Tap on High Efficiency to select it. You’ll know High Efficiency has been selected when a small blue check appears to its right.
Turn On Camera Grid
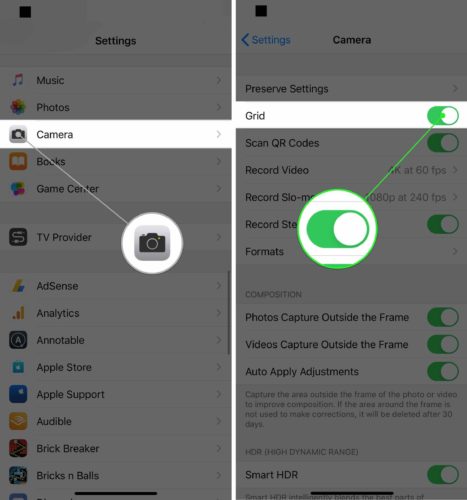
The camera grid is helpful for a couple different reasons. If you’re a casual photographer, the grid will help you center your photos and videos. For more advanced photographers, the grid will help you abide by the rule of thirds, a set of composition guidelines that will help make your photos more appealing.
Open Settings and tap Camera. Tap the switch next to Grid to turn on the camera grid. You’ll know the switch is on when it’s green.
Turn On Camera Locations Services For Geotagging
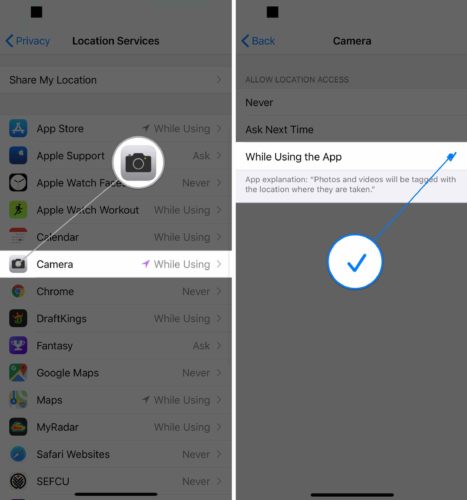
Your iPhone can geotag your images and automatically create folders of images based on where you took them. All you have to do is let Camera access your location while using the app. This feature is especially handy when you’re on a family vacation!
Open Settings and tap Privacy. Then, tap Location Services -> Camera. Tap While Using the App to let Camera access your location when you’re using it.
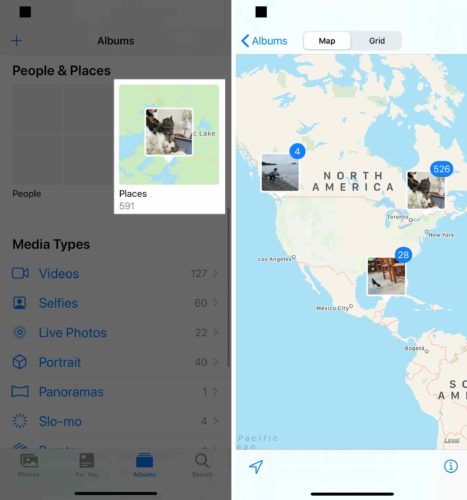
Any photos you take using Camera will be automatically sorted in the Places album in Photos. If you tap on Places in Photos, you’ll see your pictures and videos sorted by location on a map.
Turn On Smart HDR
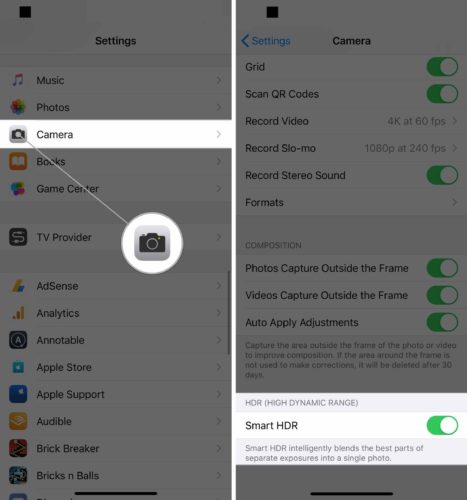
Smart HDR (High Dynamic Range) is a newer iPhone feature that blends different parts of separate exposures to compose a single photo. Essentially, it’ll help you take better photos on your iPhone. This feature is only available on the iPhone XS, XS Max, XR, 11, 11 Pro, and 11 Pro Max.
Open Settings and tap Camera. Scroll down and turn on the switch next to Smart HDR. You’ll know it’s on when the switch is green.
Turn On Every Composition Setting
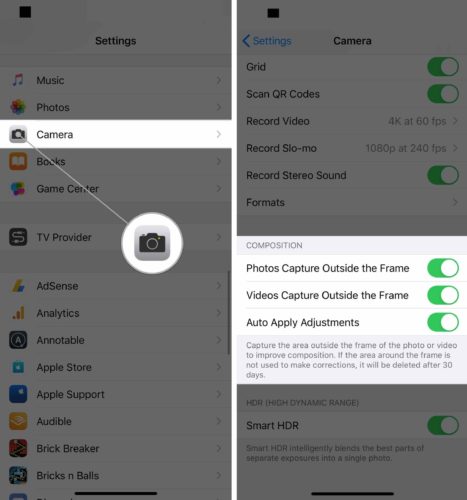
Newer iPhones support three Composition settings that capture the area just outside the frame to help improve the overall composition of photos and videos. We recommend turning them all on, as they’ll help you take higher quality photos and videos.
Open Settings and tap Camera. Turn on the switches next to the three settings underneath Composition.
Other iPhone Camera Tips
Now that you’ve set up Camera settings to take the best photos and videos possible, we want to share a few of our favorite iPhone Camera tips.
Take Photos Using The Volume Button
Did you know that you can use either volume button as a camera shutter? We prefer this method over tapping the virtual shutter button for a couple of reasons.
First, if you miss the virtual button, you may accidentally change the camera’s focus. This can result in blurry photos and videos. Second, the volume buttons are easier to press, especially when you’re taking landscape photos.
Check out our YouTube video to see this tip in action!
Set The Timer On Your iPhone Camera
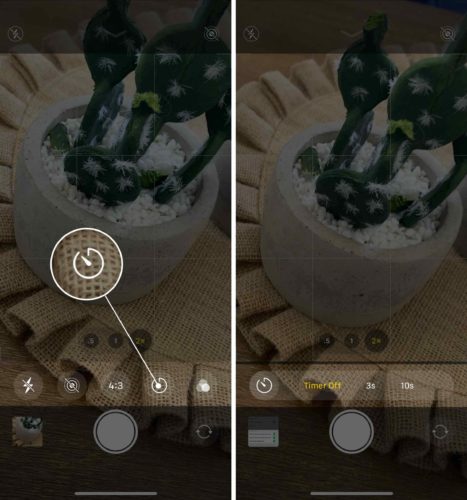
To set the timer on your iPhone, open Camera and swipe up from just above the virtual shutter button. Tap the Timer icon, then select 3 seconds or 10 seconds.
When you tap the shutter button, it’ll delay three or ten seconds before taking the picture.
How To Lock Camera Focus
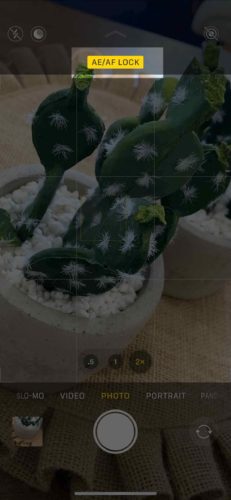
By default, the focus of the iPhone camera isn’t locked. Auto-focus will often readjust the focus of the camera, especially if someone or something within the frame moves.
To lock the focus, open Camera and press and hold on the screen. You’ll know the focus is locked when AE/AF Lock appears on the screen.
The Best iPhone Camera
To really take your iPhone photography skills to the next level, you might want to consider getting a new iPhone. Apple marketed the iPhone 11 Pro and iPhone 11 Pro Max as phones capable of recording professional-quality movies.
They weren’t lying! Directors have already begun shooting films on iPhones.
These new iPhones are equipped with a third, Ultra Wide lens, which is really great when you’re trying to capture an image or video of a scenic landscape. They also support Night Mode, which helps you take better photos in dimly lit environments.
We put the iPhone 11 Pro camera to the test and were very happy with the results!
Lights, Camera, Action!
You’re now an iPhone Camera expert! We hope you’ll share this article on social media to teach your friends and family about these iPhone Camera settings. Leave a comment down below with any other questions about your iPhone.
